Using AMD ROCm™ vLLM Docker Image with AMD Instinct™ MI300X
Dec 17, 2024
Overview
AMD has introduced a fully optimized vLLM Docker image tailored to deliver efficient inference of Large Language Models (LLMs) on AMD Instinct™ MI300X accelerators. This prebuilt Docker image provides developers with an out-of-the-box solution for building applications like chatbots and validating performance benchmarks. Optimized with recommended performance settings, it simplifies development and ensures maximum efficiency on MI300X hardware.
The vLLM Docker image contains ROCm software™ 6.2.1, vLLM 0.6.4, and PyTorch 2.5.0, along with key performance optimizations that target AMD Instinct MI300X accelerators.
Key Performance Optimizations:
- Integrates high-performance composable kernel-based FlashAttention-2 modules and OpenAI Triton-based FlashAttention-2 to give more choice to end users.
- Pre-configured PyTorch TunableOp General Matrix Multiplication (GEMM) tables of various models in FP16/FP8 data types for better performance.
- Custom PagedAttention kernel leveraging matrix core technology of AMD and group-query-attention (GQA) aware optimization to further improve the decoding performance of the PagedAttention V1 & V2
- Latest hipBLASLt library to perform the best linear algebra operations on FP8 data types.
- Skinny GEMM optimization for low batch decoding, enabling matrix multiplication processes faster and more efficient when handling small batches.
In this blog, we’ll share how to use the vLLM Docker image and quickly validate the expected inference performance numbers on the Instinct MI300X accelerators.
Before We Dive In: PyTorch with ROCm Software for Ease-of-Use
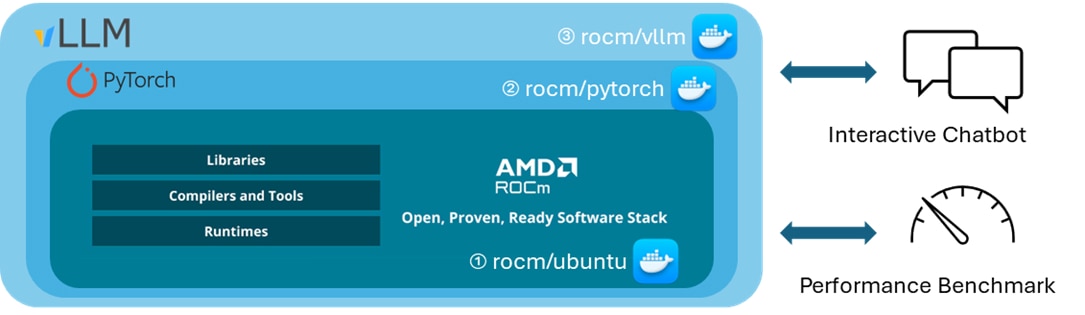
ROCm software fully supports PyTorch, providing a robust foundation for building high-performance inference frameworks such as vLLM, SGLang, and Hugging Face’s Text Generation Inference (TGI). Developers can tailor their Docker images using different build recipes to either minimize the image size for production use or enhance the performance of LLM frameworks with advanced optimizations.
Option 1: Start from ROCm software only
- Minimal Docker image with ROCm software on Ubuntu 22.04 or 20.04. Suitable for developers who want to manually install frameworks like PyTorch.
- Tags: ROCm dev-ubuntu-22.04, ROCm dev-ubuntu-20.04
Option 2: Start from the ROCm software with PyTorch
- Includes ROCm software and pre-installed PyTorch for immediate ML/DL development. It is ideal for PyTorch-based projects without additional setup.
- Tags: ROCm PyTorch
Option 3: Start from the ROCm software with PyTorch and vLLM
- Fully integrated with ROCm, PyTorch, and vLLM, optimized with the latest libraries (e.g., latest FlashAttention, high-performance BLAS library); ideal for LLM development and benchmarking.
- Tags: ROCm vLLM
This blog focuses on option 3, offering a prebuilt vLLM Docker image optimized for development purposes. The image is large due to the inclusion of numerous pre-integrated tools, libraries, and dependencies that streamline LLM development and benchmarking. We recommend starting with option 1 for a production-ready setup to build a more compact and customized image. Future releases will work toward reducing the vLLM image size.
Performance-optimized vLLM Docker for AMD GPUs
This section demonstrates how to use the performance-optimized vLLM Docker image for real-world applications, such as deploying an interactive chatbot
Application Example: Interactive Chatbot
We’ll set up the Llama 3.1 405B FP8 model running on 4 AMD GPUs using the vLLM backend server for this example. Follow the steps below to get started.
Setting up the vLLM Backend Server
Paste and run the following commands in the Linux terminal on a system equipped with MI300X accelerators.
		# Set up the vLLM backend server
export MODEL=amd/Llama-3.1-405B-Instruct-FP8-KV
export DOCKER_IMG=rocm/vllm:rocm6.2_mi300_ubuntu20.04_py3.9_vllm_0.6.4
export HOST_PORT=8011
export HF_TOKEN="your personal Hugging Face token to access gated models"

docker run --rm --device=/dev/kfd --device=/dev/dri --group-add video --shm-size 16G \
    -p $HOST_PORT:8011 \
    --security-opt seccomp=unconfined \
    --security-opt apparmor=unconfined \
    --cap-add=SYS_PTRACE \
    -v $(pwd):/workspace \
    --env HUGGINGFACE_HUB_CACHE=/workspace \
    --env VLLM_USE_TRITON_FLASH_ATTN=0 \
    --env PYTORCH_TUNABLEOP_ENABLED=1 \
    --env HF_TOKEN=$HF_TOKEN \
    $DOCKER_IMG python3 -m vllm.entrypoints.openai.api_server \
    --model $MODEL \
    --swap-space 16 \
    --disable-log-requests \
    --dtype float16 \
    --quantization fp8 \
    --kv-cache-dtype fp8 \
    --tensor-parallel-size 4 \
    --gpu-memory-utilization 0.9 \
    --max-model-len 131072 \
    --max-num-batched-tokens 131072 \
    --num-scheduler-steps 1 \
    --max-seq-len-to-capture 256 \
    --max-num-seqs 256 \
    --host 0.0.0.0 \
    --port 8011 \
    --distributed-executor-backend "mp"


# Wait until you can see this message that server is ready
#INFO:     Started server process [1]
#INFO:     Waiting for application startup.
#INFO:     Application startup complete.
#INFO:     Uvicorn running on socket ('0.0.0.0', 8011) (Press CTRL+C to quit)

# rocm-smi; 4 GPUs are ready for LL3.1 405B
#========================================= ROCm System Management Interface =========================================
#================================================== Concise Info ====================================================
#Device  Node  IDs              Temp        Power     Partitions          SCLK     MCLK    Fan  Perf  PwrCap  VRAM%  GPU%
#              (DID,     GUID)  (Junction)  (Socket)  (Mem, Compute, ID)
#==========================================================================================================================
#0       2     0x74a1,   28851  44.0°C      170.0W    NPS1, SPX, 0        2112Mhz  900Mhz  0%   auto  750.0W  78%    0%
#1       3     0x74a1,   51499  40.0°C      172.0W    NPS1, SPX, 0        2108Mhz  900Mhz  0%   auto  750.0W  78%    0%
#2       4     0x74a1,   57603  40.0°C      173.0W    NPS1, SPX, 0        2113Mhz  900Mhz  0%   auto  750.0W  78%    0%
#3       5     0x74a1,   22683  36.0°C      171.0W    NPS1, SPX, 0        2105Mhz  900Mhz  0%   auto  750.0W  78%    0%
#4       6     0x74a1,   53458  38.0°C      133.0W    NPS1, SPX, 0        132Mhz   900Mhz  0%   auto  750.0W  0%     0%
#5       7     0x74a1,   26954  34.0°C      131.0W    NPS1, SPX, 0        132Mhz   900Mhz  0%   auto  750.0W  0%     0%
#6       8     0x74a1,   16738  40.0°C      133.0W    NPS1, SPX, 0        132Mhz   900Mhz  0%   auto  750.0W  0%     0%
#7       9     0x74a1,   63738  38.0°C      132.0W    NPS1, SPX, 0        131Mhz   900Mhz  0%   auto  750.0W  0%     0%
Accessing the vLLM Backend Server from Client
Open another Linux terminal and check if the server is working.
		# Sample request to the LLM server
curl http://localhost:8011/v1/chat/completions \
-H "Content-Type: application/json" \
-d '{ "model": "amd/Llama-3.1-405B-Instruct-FP8-KV",
"messages": [
{"role": "system", "content": "You are a helpful assistant."},
{"role": "user", "content": "Who won the world series in 2020?"}
] }'

# Sample response from the LLM server
#{"role":"assistant","content":"The Los Angeles Dodgers won the 2020 World Series. \
#They defeated the Tampa Bay Rays in the series 4 games to 2, winning the final game on October 27, 2020.","tool_calls":[]}
Now launch an LLM GUI so that the Llama3.1 405B chatbot can be accessed via web browsers.
		wget https://raw.githubusercontent.com/ROCm/vllm/a466f09d7f20ca073f21e3f64b8c9487e4c4ff4b/examples/gradio_openai_chatbot_webserver.py
pip install gradio openai
python3 gradio_openai_chatbot_webserver.py \
    --model-url http://localhost:8011/v1 \
    --model amd/Llama-3.1-405B-Instruct-FP8-KV --temp 0.9

# Wait until you can see this message that server is ready
#* Running on local URL:  http://127.0.0.1:8011
#* Running on public URL: https://462423e837d1df2685.gradio.live
Open a URL https://462423e837d1df2685.gradio.live on the web browser to test if the chatbot application works as expected.
Now you have your chatbot running on AMD GPUs. As you can see, with a prebuilt, pre-optimized vLLM Docker image, developers can build their own applications quickly and easily.
Notes:
- Please refer to this vllm arguments if you want to tweak LLM server options before launching it. Changing these may have a positive or negative effect on the latency and throughput performance.
- The temporary public URL https://462423e837d1df2685.gradio.live changes whenever you launch a new LLM user interface.
Benchmark Example: Performance Validation of Latency and Throughput
To run the benchmarking test, we have automated the process of checking model latency and throughput. We have two options to reproduce the benchmark results.
While the Model Automation and Dashboarding (MAD) method automatically gathers comprehensive performance metrics under preconfigured benchmark settings, standalone benchmarking allows end users can easily tweak or debug the code inside the Docker container.
Let us look at both test options.
MAD-integrated Benchmarking
Execute the following commands to run a benchmark program. This is an example with Llama3.1 8B.
		# Download the vllm docker image and clone the MAD repo.
docker pull rocm/vllm:rocm6.2_mi300_ubuntu20.04_py3.9_vllm_0.6.4

git clone https://github.com/ROCm/MAD
cd MAD
pip install -r requirements.txt

# Launch a benchmark program.
export MAD_SECRETS_HFTOKEN="your personal Hugging Face token to access gated models"
python3 tools/run_models.py --tags pyt_vllm_llama-3.1-8b --keep-model-dir --live-output --timeout 28800

# Benchmark results will be collected under this directory
~/run_directory/reports_float16/summary/Meta-Llama-3.1-8B-Instruct_latency_report.csv
~/run_directory/reports_float16/summary/Meta-Llama-3.1-8B-Instruct_throughput_report.csv
To measure the performance of other models, change the –tags arguments:
Model name |
|
pyt_vllm_llama-3.1-8b |
pyt_vllm_llama-3.1-8b_fp8 |
pyt_vllm_llama-3.1-70b |
pyt_vllm_llama-3.1-70b_fp8 |
pyt_vllm_llama-3.1-405b |
pyt_vllm_llama-3.1-405b_fp8 |
pyt_vllm_llama-2-7b |
|
pyt_vllm_llama-2-70b |
|
pyt_vllm_mixtral-8x7b |
pyt_vllm_mixtral-8x7b_fp8 |
pyt_vllm_mixtral-8x22b |
pyt_vllm_mixtral-8x22b_fp8 |
pyt_vllm_mistral-7b |
|
pyt_vllm_qwen2-7b |
|
pyt_vllm_qwen2-72b |
|
pyt_vllm_jais-13b |
|
pyt_vllm_jais-30b |
|
Standalone Benchmarking
Execute the following commands to run a benchmark program. We use the same Llama3.1 8B as an example.
		# Download the vllm docker image and Lanch a vllm docker container
docker pull rocm/vllm:rocm6.2_mi300_ubuntu20.04_py3.9_vllm_0.6.4

export HF_TOKEN="your personal Hugging Face token to access gated models"

docker run -it --device=/dev/kfd --device=/dev/dri --group-add video --shm-size 16G \
    --security-opt seccomp=unconfined \
    --security-opt apparmor=unconfined \
    --cap-add=SYS_PTRACE \
    -v $(pwd):/workspace \
    --env HUGGINGFACE_HUB_CACHE=/workspace \
    --env VLLM_USE_TRITON_FLASH_ATTN=0 \
    --env PYTORCH_TUNABLEOP_ENABLED=1 \
    --env HF_TOKEN=$HF_TOKEN \
    --name vllm_v0.6.4 rocm/vllm:rocm6.2_mi300_ubuntu20.04_py3.9_vllm_0.6.4

# (inside the docker) Clone the MAD repo
git clone https://github.com/ROCm/MAD
cd MAD/scripts/vllm

# Launch a benchmark program.
./vllm_benchmark_report.sh -s all -m meta-llama/Meta-Llama-3.1-8B-Instruct -g 1 -d float16

# Benchmark results will be collected under this directory
~/reports_float16/summary/Meta-Llama-3.1-8B-Instruct_latency_report.csv
~/reports_float16/summary/Meta-Llama-3.1-8B-Instruct_throughput_report.csv
To measure the performance of other models under different conditions, change the following arguments:
./vllm_benchmark_report.sh -s $test_option -m $model_repo -g $num_gpu -d $datatype
Name |
Options |
Description |
$test_option |
latency |
Measure decoding token latency |
throughput |
Measure token generation throughput |
|
all |
Measure both throughput and latency |
|
$model_repo |
meta-llama/Meta-Llama-3.1-8B-Instruct |
Llama 3.1 8B |
(float16) |
meta-llama/Meta-Llama-3.1-70B-Instruct |
Llama 3.1 70B |
meta-llama/Meta-Llama-3.1-405B-Instruct |
Llama 3.1 405B |
|
meta-llama/Llama-2-7b-chat-hf |
Llama 2 7B |
|
meta-llama/Llama-2-70b-chat-hf |
Llama 2 70B |
|
mistralai/Mixtral-8x7B-Instruct-v0.1 |
Mixtral 8x7B |
|
mistralai/Mixtral-8x22B-Instruct-v0.1 |
Mixtral 8x22B |
|
mistralai/Mistral-7B-Instruct-v0.3 |
Mistral 7B |
|
Qwen/Qwen2-7B-Instruct |
Qwen2 7B |
|
Qwen/Qwen2-72B-Instruct |
Qwen2 72B |
|
core42/jais-13b-chat |
JAIS 13B |
|
core42/jais-30b-chat-v3 |
JAIS 30B |
|
$model_repo |
amd/Meta-Llama-3.1-8B-Instruct-FP8-KV |
Llama 3.1 8B |
(float8) |
amd/Meta-Llama-3.1-70B-Instruct-FP8-KV |
Llama 3.1 70B |
amd/Meta-Llama-3.1-405B-Instruct-FP8-KV |
Llama 3.1 405B |
|
amd/Mixtral-8x7B-Instruct-v0.1-FP8-KV |
Mixtral 8x7B |
|
amd/Mixtral-8x22B-Instruct-v0.1-FP8-KV |
Mixtral 8x22B |
|
$num_gpu |
1 or 8 |
Number of GPUs |
$datatype |
float16, float8 |
Data type |
Customizing the Benchmark Conditions
Developers can effortlessly switch between various model types to obtain either a complete set of results or focus on specific outputs to evaluate the model's performance. When assessing performance, it’s important to consider both latency and throughput. Latency measures the time taken for the model to process a single request; from the moment the input token is provided until the output token is received. In contrast, offline throughput measures the generated output tokens of multiple requests with different input and output combinations. Users also can change these conditions in ./vllm_benchmark_report.sh
What’s Next
AMD collaborates with innovators like vLLM and other partners to deliver performance and ease of use features across diverse workloads. This approach empowers developers to drive innovation, optimize applications, and scale efficiently while benefiting from a flexible, community-driven environment.
We are excited for you to try the above Docker image to validate the benchmark LLM inference performance numbers on Instinct MI300X accelerators. Additionally, to learn how Fireworks AI, an AMD partner, used the vLLM Docker image for inferencing and benchmarking, refer to the FireAttention V3: Enabling AMD as a Viable Alternative for GPU Inference blog.
Additional Resources
