Busting FPGA Blockchain Myths
Nov 11, 2019
- Part 1 - Intro to Ethash
- Part 2 - Intro to Vitis
- Part 3 - Importing Ethash Code
- Part 4 - Deploying the Application
Part 1: Introduction to Ethash
Getting Started with FPGA Blockchain Acceleration
(for Everybody!)
In the world of crypto currency there’s no shortage of people who shun the use of FPGA technology for acceleration of crypto currency algorithms because they feel it’s not accessible to the general public. Reasons for this vary but fall along the lines of “the tools are too expensive” or “the hardware is not accessible” or even “they’re too difficult to program”. In the past some of this may have held some ground but with the introduction Xilinx® Vitis™ unified software platform, combined with readily available FPGA acceleration boards in the cloud, this article is going to dispel these concerns as mere myths.
This article will use Ethereum as an example and demonstrate how easy it is to take the core algorithm of a crypto currency blockchain, such as Ethash in the case of Ethereum, and start accelerating it with an FPGA. This will be done using standard C++ and OpenCL without the need for costly tools and using hardware easily accessible to everybody. Enjoy!
Introduction to Ethash
Ethash is the name of the hashing algorithm that is at the core of all Ethereum transactions. This algorithm is used as a proof-of-work (PoW) that a substantial amount of distributed effort when towards the creation of a transaction (i.e. a new block in the chain). The PoW is a key part of how fraudulent transactions are prevented. When so called ‘miners’ participate in the block chain they are using compute power to try to solve the PoW and those who solve it are rewarded with some crypto currency (hence the ‘mining’ aspect of it). The more compute power a miner has the more likely they are to solve PoWs. For this article we will measure compute power in a very straight forward manner: hashes per second.
So let’s start by checking the compute power of a relatively high-end CPU. This will also introduce the source code of the Ethash algorithm which will later be used in the Vitis tool.
Fetching and Benchmarking Ethash
The Ethash algorithm is both formally published in a paper and maintained in a public Git repository. The paper, named the ‘Yellowpaper’ by the creators of Ethereum, is available here:
It describes not only the PoW, but the entire Ethereum system. The PoW, or Ethash, is described in gory mathematical detail in Appendix J of this yellow paper. In theory, you could write your own code based on this yellow paper but a quick look at the Appendix J will probably turn most people off of this option. So we will opt to use some code that has already been written for us and available on Github here:
This particular source should be quite reliable as it’s one of many repositories maintained by Ethereum.org. In fact, the yellow paper itself is also maintained at this Git location.
Steps to fetch and build the code are shown below. To ensure consistent results a specific version of the code is checked out: v23.1. This was the most recent tagged version at the time.
    $ git clone https://github.com/ethereum/ethash.git
$ git checkout v23.1
$ cd ethash
The code will build a library for various supported languages including C++ and Python but first some dependencies must be met.
$ sudo apt install libboost-dev libboost-all-dev
The above libs are leveraged to build and test the code. The code can also, optionally, leverage libcrypto++ (a.k.a. libcryptopp), but I found the unit tests failed when I added a more recent version so I’ve omitted installation of this.
With dependencies met, running Make should result in something similar to below.
    $ make
./test/test.sh

################# Testing JS ##################

################# Testing C ##################
make[1]: Entering directory '/home/ethash/test/c/build'
make[2]: Entering directory '/home/ethash/test/c/build'
make[3]: Entering directory '/home/ethash/test/c/build'
make[4]: Entering directory '/home/ethash/test/c/build'
Scanning dependencies of target ethash
make[4]: Leaving directory '/home/ethash/test/c/build'
make[4]: Entering directory '/home/ethash/test/c/build'
[ 16%] Building C object src/libethash/CMakeFiles/ethash.dir/util.c.o
[ 33%] Building C object src/libethash/CMakeFiles/ethash.dir/internal.c.o
[ 50%] Building C object src/libethash/CMakeFiles/ethash.dir/sha3.c.o
[ 66%] Linking C static library libethash.a
make[4]: Leaving directory '/home/ethash/test/c/build'
[ 66%] Built target ethash
make[4]: Entering directory '/home/ethash/test/c/build'
Scanning dependencies of target Test
make[4]: Leaving directory '/home/ethash/test/c/build'
make[4]: Entering directory '/home/ethash/test/c/build'
[ 83%] Building CXX object test/c/CMakeFiles/Test.dir/test.cpp.o
[100%] Linking CXX executable Test
make[4]: Leaving directory '/home/ethash/test/c/build'
[100%] Built target Test
make[3]: Leaving directory '/home/ethash/test/c/build'
make[2]: Leaving directory '/home/ethash/test/c/build'
make[1]: Leaving directory '/home/ethash/test/c/build'
Running 7 test cases...

*** No errors detected

################# Testing Python ##################
/home/ethash/test/python/test.sh: line 14: virtualenv: command not found
Makefile:3: recipe for target 'test' failed
make: *** [test] Error 127
Since we’re only after the C build at this point the error for the Python build can be safely ignored. Running the top-level Make will kick-off CMake which in-turn generates Make files for the available languages. Next we will build for C as follows:
    $ cd test/c/build
$ make help
$ make ethash
TIP: If you run into errors running Make you can modify the ethash/test/c/test.sh file to replace
cmake ../../.. > /dev/null
with
cmake ../../..
This will provide more output about CMake generation and dependency checks.
This builds and places the Ethash static library at ethash/test/c/build/src/libethash/libethash.a for which we can build some provided benchmarking code. As should have been seen after running Make with the ‘help’ option there are several targets available in addition to just the library. For a test that mimics the way a miner would use Ethash we’ll want to build and run the Benchmark_FULL program. However, the code seems to be missing a statement when built without the previously mentioned libcrypto++ so we’ll quickly fix this first. Simply open ethash/src/benchmark/benchmark.cpp and make the addition highlighted below.
    #else
#include "libethash/sha3.h"
#include <string>
#endif // WITH_CRYPTOPP
Now we can build as normal:
    $ make Benchmark_FULL
[ 66%] Built target ethash
Scanning dependencies of target Benchmark_FULL
[ 83%] Building CXX object src/benchmark/CMakeFiles/Benchmark_FULL.dir/benchmark.cpp.o
[100%] Linking CXX executable Benchmark_FULL
[100%] Built target Benchmark_FULL
Now the benchmarking application can be run. An example of some results is given below. Note that since this was built on a computer without GPU hardware (or with respect to the software without OpenCL) these results are an example of pure CPU performance.
    $ ./src/benchmark/Benchmark_FULL
ethash_mkcache: 782ms, sha3:
6a286c5fc0f36814732c86c3e71c036dd96d58def86b9244bb1480571e67d2a8
ethash_light test: 4ms,
a7ea1de3a8007134900cd2c86f7e55af68a1d3e4537438a0a966b6cbafa23c90
ethash_compute_full_data: 671116ms
ethash_full test: 25ns,
a7ea1de3a8007134900cd2c86f7e55af68a1d3e4537438a0a966b6cbafa23c90
hashrate:	59425, bw:	464 MB/s
Actually running the benchmark program can take quite sometime as seen by the “671116ms” (~11mins) taken to create the full dataset in the case above, but the results indicate a rate of ~59.4k hashes per second with an individual hash generated in 25ns.
The hexadecimal output given by the benchmark program represent 32-byte hash values with the last two representing the actual output of the PoW; they were simply calculated in two different ways.
Now that we have an idea of where to get the PoW code, how to build it, and how to test it let’s move on to bringing the code into acceleration tools.
Read Busting FPGA Blockchain Myths Part 2: Introduction to Vitis
Part 2: Introduction to Vitis
Now we’ll start driving the new AMD Vitis tool! This section will cover the installation of the tool for the use-case at hand. That is, for the acceleration of an algorithm on a AMD Alveo™ Data Center accelerator card. Then the Ethash code will be brought into the tool, refactored as necessary, and built. It’s important to note up front that we are not attempting to optimize the code in this article as this is left as an exercise for interested readers!
Installation of Vitis
This section provides quick overview of installing Vitis technology. For complete details, including system requirements, refer to the <installation/release notes> (UG<####>).
The AMD Vitis installer can be downloaded from here:
The Vitis tool can be used for various applications (e.g. embedded development, AI edge development, high-performance compute acceleration) but for our acceleration use-case it will need to be installed on a Linux box with a fair bit of available disk space (~50GB).
Downloading and installing the tool will require AMD user credentials so if you don’t already have a free AMD user account you will want to create one here:
Once you’ve downloaded the installer (*.bin file) simply run it as an executable. If the file doesn’t have execution privileges, you’ll need to add it. For example:
chmod +x <Xilinx_Installer_file>.bin
./<Xilinx_Installer_file>.bin
Alternatively, if you downloaded the complete offline installer you just run the setup file:
./xsetup
The installer will prompt you to select optional components. The breakdown of these components will look something like:
Design Tools
- IDE
- DocNav
Devices
- Install devices for Alveo and Xilinx edge acceleration platforms
- Devices for Custom Platforms
- Engineering Sample Devices
Installation Options
These options can impact the install size quite a bit so to minimize the install footprint you can deselect the “Devices for Custom Platforms” device component. Otherwise the remaining default options will be fine.
Additional Dependencies
Vitis technology leverages the OpenCL framework for acceleration flows and to compile OpenCL applications the appropriate header files are required. For Ubuntu this is handled by the ocl-icd-opencl-dev package.
sudo apt install ocl-icd-opencl-dev
Although it was worth highlighting this particular package because of the important role OpenCL will play, this step can be skipped because it will be installed along with other XRT dependencies as covered next.
The Vitis application acceleration development flow also relies on a Xilinx Runtime (XRT) framework. XRT is simply a software stack for the deployment environment that established an interface between the host and the targeted acceleration device. Even if your development environment is separate from your deployment environment XRT will still be needed to build acceleration applications. To ensure all the dependencies of XRT are met before installing the framework a shell script is provided in the XRT GitHub repo. This can be downloaded and run as follows.
$ wget https://raw.githubusercontent.com/Xilinx/XRT/master/src/runtime_src/tools/scripts/xrtdeps.sh
$ chmod +x xrtdeps.sh
$ sudo ./xrtdeps.sh
Lastly, we install XRT itself and some board-specific packages. In this article we will target the AMD Alveo U200 so these final packages can be downloaded from the U200 Getting Started page:
https://www.amd.com/en/support/downloads/alveo-downloads.html/accelerators/alveo/u200.html
Three separate packages will be needed from the site above. They will have names along the lines of:
- xrt_*.deb
- xilinx-u200-xdma-*.deb
- xilinx-u200-xdma-*-dev-*.deb
Install each of these in sequence. It’s also worth noting that despite the naming of the packages both the “Deployment Shell” and the “Development Shell” are needed on the development/build environment. An example of installing a particular version of these packages is given below.
$ sudo apt install ./xrt_201910.2.2.2173_18.04-xrt.deb
$ sudo apt install ./xilinx-u200-xdma-201830.2-2580015_18.04.deb
$ sudo apt install ./xilinx-u200-xdma-201830.2-dev-2580015_18.04.deb
Creating a New Acceleration Application
Time to launch the Vitis tool and get our hands dirty! If launching the tool from the command line the shell environment must first be setup correctly using a supplied script. For example:
$ source /opt/Xilinx/Vitis/2019.2/settings64.sh
$ vitis&
From the Vitis IDE we create a new Application Project (e.g. File > New > Application Project…). After naming the project you’ll be asked to select a platform. Which platforms are available will depend upon which board-specific packages that were installed. Since we installed packages for the U200 at least this platform should be available, in addition to possibly some pre-installed defaults.

Moving forward with the U200 platform selected we then choose to create the “Vector Addition” example. Once the application is created the project should resemble the screenshot below.

Although we could’ve started with an empty application, choosing the vector addition example will allow us to leverage the supplied host code. OpenCL involves a fair bit of boilerplate code, so it’ll be nice to not re-write that.
Now readers not familiar with AMD acceleration flows are certainly encouraged to play around with the simple vector addition example. This goes hand-in-hand with several supporting resources such as:
- Vitis tutorial
- GitHub SDAccel Tutorials
- GitHub SDAccel Examlpes
In this article, however, we’ll cut to the chase and replace the example kernel with Ethash code. But first a quick summary of the source files:
- vadd.cpp->pow.cpp: This is the main application file and represents the host code. It’s responsible for initializing the OpenCL framework and loading/executing the acceleration kernel.
- vadd.h->pow.h: Just a header file for the application. Includes the required OpenCL header.
- rnl_vadd.cl->krnl_ethash.cl: Actual kernel. Ultimately this code will get run on the targeted FPGA.
- xcl.*: These just provide helper functions. For this simple example, they aren’t used and can be ignored/removed.
Note how each file above was also renamed, as indicated by ‘->’, to better reflect the desired application.
Read Busting FPGA Blockchain Myths Part 3: Importing Ethash Code
Part 3: Importing Ethash code
Earlier in this article we built and benchmarked the Ethash algorithm, but we didn’t actually take a close look at the code. Should you take the time to inspect the benchmark code you would find that the following line calls the Ethash function:
ethash_full(&hash, full_mem, ¶ms, previous_hash, nonce);
This, in-turn, calls upon the Ethash library and falls upon the following function in libethash/internal.c:
static void ethash_hash(
ethash_return_value *ret,
node const *full_nodes,
ethash_cache const *cache,
ethash_params const *params,
const uint8_t header_hash[32],
const uint64_t nonce) {
...
This function is effectively a C representation of the PoW algorithm given in the Ethereum yellow paper. Programmers will take lite in the fact that the C code is significantly easier to follow than the paper. Additionally, there’s some architecture-specific code in the function that can be ignored for the sake of this exercise as well as some code that assumes the presence of cached data. Removing all such code simplified the function to a purely raw representation of the PoW algorithm as given below.
    static void ethash_hash(
        ethash_return_value *ret,
        node const *full_nodes,
        ethash_cache const *cache,
        ethash_params const *params,
        const uint8_t header_hash[32],
        const uint64_t nonce) {

    // pack hash and nonce together into first 40 bytes of s_mix
    node s_mix[MIX_NODES + 1];
    memcpy(s_mix[0].bytes, header_hash, 32);

    s_mix[0].double_words[4] = nonce;

    // compute sha3-512 hash and replicate across mix
    SHA3_512(s_mix->bytes, s_mix->bytes, 40);

    node *const mix = s_mix + 1;
    for (unsigned w = 0; w != MIX_WORDS; ++w) {
        mix->words[w] = s_mix[0].words[w % NODE_WORDS];
    }

    unsigned const
            page_size = sizeof(uint32_t) * MIX_WORDS,
            num_full_pages = (unsigned) (params->full_size / page_size);

    for (unsigned i = 0; i != ACCESSES; ++i) {
        uint32_t const index = ((s_mix->words[0] ^ i) * FNV_PRIME ^ mix->words[i
         % MIX_WORDS]) % num_full_pages;

        for (unsigned n = 0; n != MIX_NODES; ++n) {
            const node *dag_node = &full_nodes[MIX_NODES * index + n];

            for (unsigned w = 0; w != NODE_WORDS; ++w) {
                mix[n].words[w] = fnv_hash(mix[n].words[w], dag_node->words[w]);
            }
        }
    }

    // compress mix
    for (unsigned w = 0; w != MIX_WORDS; w += 4) {
        uint32_t reduction = mix->words[w + 0];
        reduction = reduction * FNV_PRIME ^ mix->words[w + 1];
        reduction = reduction * FNV_PRIME ^ mix->words[w + 2];
        reduction = reduction * FNV_PRIME ^ mix->words[w + 3];
        mix->words[w / 4] = reduction;
    }

    memcpy(ret->mix_hash, mix->bytes, 32);
    // final Keccak hash
    SHA3_256(ret->result, s_mix->bytes, 64 + 32); // Keccak-256(s + compressed_mix)
}
Now a naïve approach would simply copy this code and use it to replace the kernel code in our krnl_vadd.cl file. Although this is the right idea, a flood of compilation errors would quickly reveal some flaws to this including:
- The code makes extensive use of macros and helper functions that are defined in separate libethash files.
- Some standard C coding practices aren’t necessarily acceptable to OpenCL (e.g. memcpy).
- The arguments used by this function don’t match the arguments from the ‘vadd’ example and in the case of OpenCL argument, passing requires some special handling (i.e. you can’t just redefine the function prototype).
But overall, the work required is not that bad:
- Add all dependent macros and helper functions to the kernel *.cl file.
- Replace all instances of memcpy as well as any datatypes not natively supported by OpenCL
- Update the host *.cpp code to accommodate appropriate arguments
Consolidating Code Into Single Kernel File
The PoW function makes extensive use of SHA-3 (Secure Hash Algorithm 3). This is a standard function specified by NIST (National Institute of Standards and Technology) and the actual algorithm originates from a hashing function known as Keccak. Inside libethash the particular implementation of Keccak used by the PoW is supplied in the sha3.c/h files.
In order for our Ethash function to run as an individual kernel we’ll need to pull in all this supporting SHA-3 code. There are also several macro definitions spread across the header files ethash.h, fnv.h, and internal.h. Consolidating all this code into a single file results in the following:
https://github.com/mkycrb/ethash/blob/master/c/ethash.c
We can now copy this code into the exiting krnl_vadd.cl file, while maintaining the OpenCL kernel attribute. The initial import will look like this:
https://github.com/mkycrb/ethash/blob/fc1419c1ed0cebc0868c6b80ff046a7da8bb94d3/ocl/krnl_ethash.cl
As mentioned earlier, this will definitely not compile as there are several aspects of the code that are not OpenCL compliant. So, we correct this mostly by replacing some datatypes and removing calls to standard libc functions. The arguments of the kernel are also updated to fit the OpenCL framework; that is, large data shared between the host and kernel is marked as global. The resulting changes can be seen here:
Now that the kernel is in good shape we just need to update the host code to pass in the appropriate data. This is a good time to review the arguments a little.
- ethash_return_value: The PoW actually returns two hash values so the original code used a special structure to hold these. In the OpenCL these are simply split out into two 32-byte hash values ret_mix & ret_hash.
- full_nodes: This is the core data that the PoW function works with. It is a large dataset (>1GB) of hashes that can be reproduced consistently by any mining computer. The PoW creates hashes based on pseudo-random chunks of data from this dataset. This dataset is also referred to as the DAG, after Dagger Hashimoto (a hashing algorithm that contributed to how the DAG is generated).
- ethash_params: This contained information about the size of some data, including the DAG. To simplify things for now we discard this argument and test on a fixed size DAG.
- header_hash: This is a 32-byte hash representing the previous block in a block-chain. For the sake of testing, this is just an arbitrary value since we not actually interfacing with the live blockchain.
- nonce: This is just a random integer-valued seed. When the PoW is used to mine, it iterates over changing seed values until is produces a hash that meets certain criteria. For the sake of testing, we’ll just fix this to zero.
So as can be seen from above, the only argument we have to worry about is the DAG. The rest are fairly arbitrary and easy to define in code.
Generating the DAG
In the benchmark code that was run earlier the DAG was generated in memory prior to the Ethash function being called, but you may also recall that this took over 10mins. Re-generating the DAG every time we want to test the PoW function is not very practical so we will dump the value to a file and then add code to the host program to read it in.
To save the DAG to a file a simple Python script was used. You may recall that several languages were supported for the Ethash library, including Python. So for this exercise, we simply went back and built the Python module (installing any required dependencies) and then ran the script below.
    import pyethash

with open("cache","rb") as fcache:
    cache = fcache.read()

# Using same block 0 from benchmark code
data_size = pyethash.get_full_size(0)

print("Generating dataset (DAG) of size %d." % data_size)
dataset = pyethash.calc_dataset_bytes(data_size, cache)

with open("dataset","w+b") as fcache:
    fcache.write(dataset)
As mentioned earlier, the size of the DAG can vary. It’s size actually depends upon an Ethereum property called ‘epoch’ which increases with time. For the sake of testing we’ll use the smallest possible DAG (1GB) by selecting an epoch of zero.
Update Host Code
The primary changes needed for the host code are an update to the arguments passed to the kernel and the initialization of these arguments. A summary of these changes can be seen here:
https://github.com/mkycrb/ethash/commit/6b9be20600b51e3357fb7e9331831a0f474991ab
Note that some helper functions were also included (originally from Ethash library) to convert between hexadecimal strings and binary data.
It should also be noted that the value selected for the “header_hash” was not entirely arbitrary. We chose the same value used in the benchmark test so that we can compare results. This holds true for the “nonce” as well which is zero in both cases.
The code should now be ready to compile and test! The state of all the files can be viewed here:
https://github.com/mkycrb/ethash/tree/Emulation-SW-v1
Building and Testing
When a new project is created in the Vitis tool it comes with 3 build & run configurations:
- Emulation-SW: Allows you to build and run a kernel in the development environment without using or emulating an Alveo board. When running, the kernel will just execute like native code on the host.
- Emulation-HW: This will start building the kernel for the targeted Alveo board but only to the extent that is required to emulate functionality when running. This will provide performance estimates.
- System: This will do a complete build of the kernel for the targeted Alveo board and can take substantially more time than either Emulation build and a run will require an actual board.
It’s best to step through each of these in order when attempting to build/compile code. A build and/or run in an earlier stage does not guarantee success in the next stage because the requirements become more stringent and validation more extensive with each stage.
The example ‘vadd’ project was already configured to build the kernel for an Alveo board, but since we changed the name of the kernel we’ll need to update this. In the Application Project Settings window, all the Hardware Functions are listed. The ‘krnl_vadd’ can be selected and removed. For example:

Now we add a new kernel (see below) and select our ‘krnl_ethash’ from the list that’s presented. This brings our project to a state that should be ready to build.

By default, new projects are configured for “Emulation-SW” so we can just go ahead and build the code (e.g. Project > Build Project). The build process is logged in the Console tab and the final output should confirm a successful build. For example:

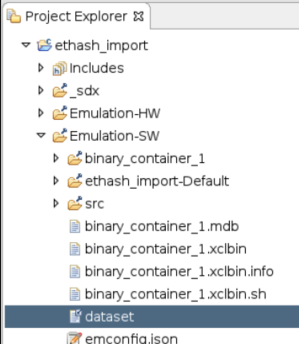
Now’s a good time to run the code and just confirm that it’s still doing what we expect after all the important changes. Note the code assumes the availability of the DAG file in the Emulation-SW folder of the project (named ‘dataset’ in the screenshot below). This is simply the file generated by the Python script covered earlier.
This is also a good time to review the two key output products of the build process. Also located in the applicable Emulation-* folder is a *.xclbin file and a *.exe file. The *.xclbin file represents the kernel. At this stage of software emulation, its contents are far from its final format, but eventually, this will be the file actually loaded into the Alveo board. This file will customize the board to run the applicable kernel in hardware. The *.exe file represents the host code that will eventually run on the system hosting the Alveo board. At a minimum, it will take the *.xclbin file as an argument since it will be responsible for loading the kernel.
Running the code (e.g. Run > Run) should print some output on the Console window. This includes confirmation that the *.xclbin was loaded, confirmation that the DAG was loaded, and then finally the results of running Ethash as shown below.
Loading: '../binary_container_1.xclbin'
dag loaded
mix: a3676e668d4a4a9de2d4688dfd9cc84c65464990fc58f2885e1b8f8bfd028b5a
hsh: a7ea1de3a8007134900cd2c86f7e55af68a1d3e4537438a0a966b6cbafa23c90
The output shows both hashes returned by the PoW, but if we look at the last ‘hsh’ value and compare it with the output from running the benchmark program on a PC we see that they match. That confirms the code is still functionally correct!
Estimating Performance
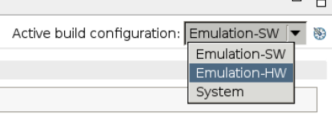
Now we will move to the next stage of building/running: hardware emulation. Switching to this configuration can be done from a drop-down menu at the top-right of the Application Project Settings as shown below.
Now we simply build and run again, just as we did for software emulation. The difference, however, is that after running a hardware emulation will view some reports that estimate performance. In fact, there are several reports available, but here we will look like just two:
- Profile Summary
- Application Timeline
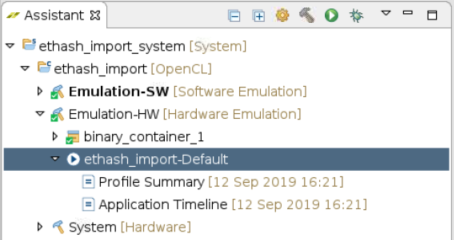
Although these reports are available within the project folders, the Assistant window is provided for easy access to all reports. An example of the two we’ll look at here is given below. Note that these two particular reports will only become available after both building and running the application.
Opening the Profile Summary will provide something similar to the screenshot below.

It’s important to remember that these are just estimates since nothing was run on real hardware, but they none-the-less provide some nice sanity checks that the system is working as expected. For example, we see that the kernel incurred the highest number of data transfers (67 in this case), which makes sense because the PoW is intended to be heavily memory bound. Meaning it’s accessing memory a lot (making this a limiting factor for performance) as it grabs and processes chunks of the DAG. We can also see the large memory transfer of the DAG from host memory to (global) on-board memory at address 0x4000002000. And again, don’t be discouraged by the skewed emulation times for data transfers. The reported time of almost 13s to transfer 1GB of data is a far cry from what will actually happen on hardware.
Next, we’ll look at the Application Timeline, which really helps visualize the various operations that take place to run the application. Below is an example screenshot:
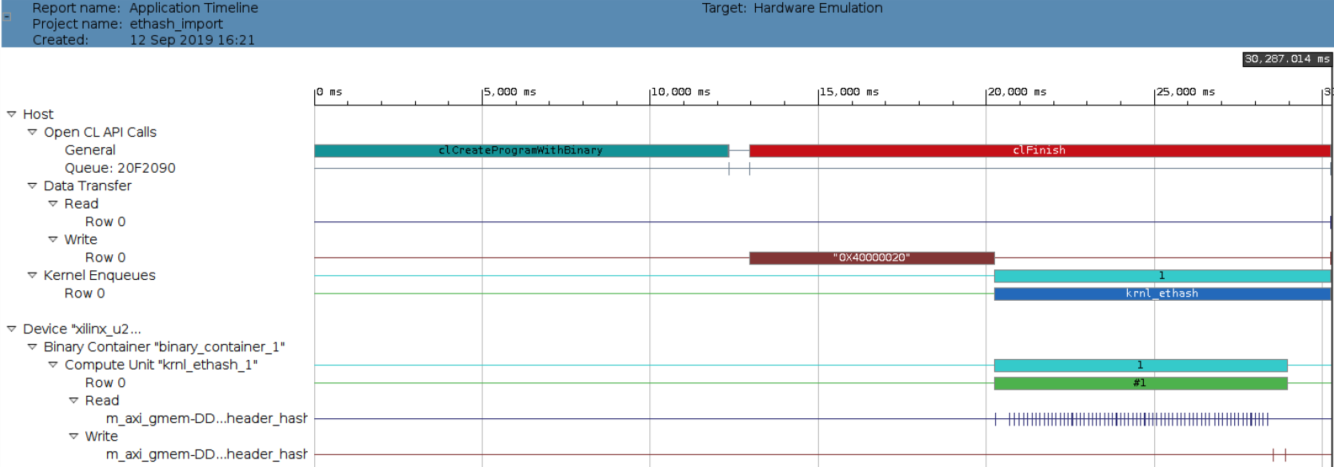
Here the top-left most bar represents the loading of the kernel. Next, at around center, we see the DAG getting loaded. Then immediately following the DAG are several bars representing different aspects of the kernel executing. Near the bottom, we can also see a multitude of pulses representing dispersed memory reads as the kernel fetches data from the DAG.
This is a great exercise to confirm that the algorithm in functionally correct and the hardware will do as is expected, but it also demonstrates that running the code as-is is not an ideal solution for the sake of acceleration. For example, the report indicates a relatively long latency estimate (which tends to be ball-park accurate) for the kernel at 0.044ms and the memory utilization is very low at just 1.872% (as taken from the Data Transfers tab of the Profile Summary). This is because we took C code designed to run in a fairly serial manner on CPU clocked at a very high frequency and applied it to an FPGA, which is very good at leveraging parallelism, and ran it in a still serial manner at a much lower clock rate (300MHz).
None-the-less, we have a working kernel to use as a starting point towards additional optimizations that can yield higher levels of memory utilization and parallelism. A nice exercise for the interested reader! …or maybe a future article.
In the meantime, let's take what we have and run it on real hardware.
Read Busting FPGA Blockchain Myths Part 4: Deploying the Application
Part 4: Deploying the Application
Now we’ll start driving the new AMD Vitis tool! This section will cover the installation of the tool for the use-case at hand. That is, for the acceleration of an algorithm on a AMD Alveo™ Data Center accelerator card. Then the Ethash code will be brought into the tool, refactored as necessary, and built. It’s important to note up front that we are not attempting to optimize the code in this article as this is left as an exercise for interested readers!
Installation of Vitis
This section provides quick overview of installing Vitis technology. For complete details, including system requirements, refer to the <installation/release notes> (UG<####>).
The AMD Vitis installer can be downloaded from here:
The Vitis tool can be used for various applications (e.g. embedded development, AI edge development, high-performance compute acceleration) but for our acceleration use-case it will need to be installed on a Linux box with a fair bit of available disk space (~50GB).
Downloading and installing the tool will require AMD user credentials so if you don’t already have a free AMD user account you will want to create one here:
Once you’ve downloaded the installer (*.bin file) simply run it as an executable. If the file doesn’t have execution privileges, you’ll need to add it. For example:
chmod +x <Xilinx_Installer_file>.bin
./<Xilinx_Installer_file>.bin
Alternatively, if you downloaded the complete offline installer you just run the setup file:
./xsetup
The installer will prompt you to select optional components. The breakdown of these components will look something like:
Design Tools
- IDE
- DocNav
Devices
- Install devices for Alveo and Xilinx edge acceleration platforms
- Devices for Custom Platforms
- Engineering Sample Devices
Installation Options
These options can impact the install size quite a bit so to minimize the install footprint you can deselect the “Devices for Custom Platforms” device component. Otherwise the remaining default options will be fine.
Additional Dependencies
Vitis technology leverages the OpenCL framework for acceleration flows and to compile OpenCL applications the appropriate header files are required. For Ubuntu this is handled by the ocl-icd-opencl-dev package.
sudo apt install ocl-icd-opencl-dev
Although it was worth highlighting this particular package because of the important role OpenCL will play, this step can be skipped because it will be installed along with other XRT dependencies as covered next.
The Vitis application acceleration development flow also relies on a Xilinx Runtime (XRT) framework. XRT is simply a software stack for the deployment environment that established an interface between the host and the targeted acceleration device. Even if your development environment is separate from your deployment environment XRT will still be needed to build acceleration applications. To ensure all the dependencies of XRT are met before installing the framework a shell script is provided in the XRT GitHub repo. This can be downloaded and run as follows.
$ wget https://raw.githubusercontent.com/Xilinx/XRT/master/src/runtime_src/tools/scripts/xrtdeps.sh
$ chmod +x xrtdeps.sh
$ sudo ./xrtdeps.sh
Lastly, we install XRT itself and some board-specific packages. In this article we will target the AMD Alveo U200 so these final packages can be downloaded from the U200 Getting Started page:
https://www.amd.com/en/support/downloads/alveo-downloads.html/accelerators/alveo/u200.html
Three separate packages will be needed from the site above. They will have names along the lines of:
- xrt_*.deb
- xilinx-u200-xdma-*.deb
- xilinx-u200-xdma-*-dev-*.deb
Install each of these in sequence. It’s also worth noting that despite the naming of the packages both the “Deployment Shell” and the “Development Shell” are needed on the development/build environment. An example of installing a particular version of these packages is given below.
$ sudo apt install ./xrt_201910.2.2.2173_18.04-xrt.deb
$ sudo apt install ./xilinx-u200-xdma-201830.2-2580015_18.04.deb
$ sudo apt install ./xilinx-u200-xdma-201830.2-dev-2580015_18.04.deb
Creating a New Acceleration Application
Time to launch the Vitis tool and get our hands dirty! If launching the tool from the command line the shell environment must first be setup correctly using a supplied script. For example:
$ source /opt/Xilinx/Vitis/2019.2/settings64.sh
$ vitis&
From the Vitis IDE we create a new Application Project (e.g. File > New > Application Project…). After naming the project you’ll be asked to select a platform. Which platforms are available will depend upon which board-specific packages that were installed. Since we installed packages for the U200 at least this platform should be available, in addition to possibly some pre-installed defaults.
Moving forward with the U200 platform selected we then choose to create the “Vector Addition” example. Once the application is created the project should resemble the screenshot below.
Although we could’ve started with an empty application, choosing the vector addition example will allow us to leverage the supplied host code. OpenCL involves a fair bit of boilerplate code, so it’ll be nice to not re-write that.
Now readers not familiar with AMD acceleration flows are certainly encouraged to play around with the simple vector addition example. This goes hand-in-hand with several supporting resources such as:
- Vitis tutorial
- GitHub SDAccel Tutorials
- GitHub SDAccel Examlpes
In this article, however, we’ll cut to the chase and replace the example kernel with Ethash code. But first a quick summary of the source files:
- vadd.cpp->pow.cpp: This is the main application file and represents the host code. It’s responsible for initializing the OpenCL framework and loading/executing the acceleration kernel.
- vadd.h->pow.h: Just a header file for the application. Includes the required OpenCL header.
- rnl_vadd.cl->krnl_ethash.cl: Actual kernel. Ultimately this code will get run on the targeted FPGA.
- xcl.*: These just provide helper functions. For this simple example, they aren’t used and can be ignored/removed.
Note how each file above was also renamed, as indicated by ‘->’, to better reflect the desired application.